지지난주, 로컬에 csv 파일로 저장하는 부분까지 끝마쳤다. 그 다음 단계이다.
csv 영구 저장
□ docker volume
내가 만들고 있는 FastAPI 프로그램은 Docker image기반으로 제공되는데, 그 특성상 프로그램이 종료되면 내부에 저장했던 데이터가 휘발된다. 그 문제를 해결하기 위해 -v 옵션을 사용하는 방법이 있다.
로컬 경로와 컨테이너 내부 경로가 연동되어 한 쪽에서 데이터가 생성되거나 삭제되는 경우 반대쪽에서도 같은 이벤트가 발생한다. 도커 이미지가 종료되어 내부 데이터가 휘발되어도, 로컬의 데이터는 삭제되지 않기 때문에 도커 내부 데이터도 휘발되지 않는 구조로 동작할 수 있다.
# AWS 서버에서 수행
# 연결 경로 생성
$ mkdir /home/ubuntu/data/n23

# 도커 볼륨이 적용된 컨테이너로 다시 RUN
$ sudo docker run -d -p 8023:8080 \
--name food23
-v /home/ubuntu/data/n23:/code/data \
sooj1n/food:0.2.11
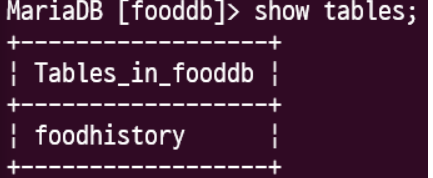
□ DB 데이터 저장
MariaDB를 사용하기 위해 docker hub에 올라와있는 것 을 pull 받아와 실행했다.

(서버가 닫혀서 그런건지(?) 데이터베이스까지는 확인이 되는데.. 테이블이 없어서 수강생 분들 블로그 사진 좀 사용했슴니다...감사)
$ docker exec -it localdb bash
root@13d1fea32321:/# mariadb -u food -p1234
Welcome to the MariaDB monitor.  Commands end with ; or \g.
Your MariaDB connection id is 3
Server version: 11.5.2-MariaDB-ubu2404 mariadb.org binary distribution

Copyright (c) 2000, 2018, Oracle, MariaDB Corporation Ab and others.

Type 'help;' or '\h' for help. Type '\c' to clear the current input statement.

MariaDB [(none)]> show databases;
+--------------------+
| Database           |
+--------------------+
| fooddb             |
| information_schema |
+--------------------+
2 rows in set (0.001 sec)

MariaDB [(none)]> use fooddb;
MariaDB [(none)]> show databases;

main.py에 아래의 내용을 추가한다.
# Connect to the database
    connection = pymysql.connect(host="localhost",
                             user='food',
                             password='<비밀번호 입력>',
                             database='fooddb',
                             port ='33306',
                             cursorclass=pymysql.cursors.DictCursor)

    sql = "INSERT INTO foodhistory(`username`, `foodname`, `dt`) VALUES(%s,%s,%s)"

    with connection:
        with connection.cursor() as cursor:
            cursor.execute(sql, ('n01', name, datetime.now()))

        connection.commit()
여기까지 수행하면 maria DB에는 잘 저장이 된다.
하지만 AWS 서버에서 위의 내용을 도커로 저장하여 실행했을 때 제대로 작동되지 않을 것 이다.
localhost 라던지.. 로컬 대상으로 db 설정을 했기 때문이다.
그래서 다른 환경에 맞게 수정을 해줘야하는데 일일히 번거롭게 수정하지 않는 방법은 환경변수 getenv를 사용하는 것 이다.
아래와 같이 os.getenv를 사용해주면 된다.
DB_IP, DB_PORT가 있다면 그걸로 실행시키고, 없으면 localhost, port 33306으로 실행시킨다는 의미이다.
DB_IP, DB_PORT는 DOCKER RUN 수행 시 지정할 값 이다.
import os

# Connect to the database
    connection = pymysql.connect(host=os.getenv('DB_IP', 'localhost'),
                             user='food',
                             password='<비밀번호 입력>',
                             database='fooddb',
                             port = int(os.getenv('DB_PORT', '33306')),
                             cursorclass=pymysql.cursors.DictCursor)

    sql = "INSERT INTO foodhistory(`username`, `foodname`, `dt`) VALUES(%s,%s,%s)"

    with connection:
        with connection.cursor() as cursor:
            cursor.execute(sql, ('n01', name, datetime.now()))

        connection.commit()
AWS 서버에서 도커를 실행시켜보자.
-e 옵션으로 DB_IP, DB_PORT 를 설정할 수 있다.
$ docker run -d -p 8023:8080 --name food23 -v /home/ubuntu/data/n23:/code/data -e FILE_PATH=/code/data/food.csv -e DB_PORT=13306 -e DB_IP=172.17.0.1 sooj1n/food01:0.3.0
여기까지 한가위 숙제 끝@

□ 데이터베이스에 파일 업로드 하기
오늘은 강사님 깃헙을 클론해서 사용했지만 지금은 복습 겸 다른 수강생분 블로그를 보고 다시 해보겠다 !!
$ cat src/mnist/main.py

from typing import Annotated
import os
from fastapi import FastAPI, File, UploadFile
from datetime import datetime
import pymysql.cursors

app = FastAPI()

@app.post("/uploadfile/")
async def create_upload_file(file: UploadFile):
    #파일 저장
    img = await file.read()
    file_name = file.filename
    upload_dir = "/Users/sujinya/code/mnist/img"
    file_full_path = os.path.join(upload_dir, file_name)

    with open(file_full_path, 'wb') as f:
        f.write(img)

    return {
            "filename": file.filename,
            "content_type": file.content_type,
            "file_full_path": file_full_path,
            "time": datetime.now()
            }
$ uvicorn src.mnist.main:app --reload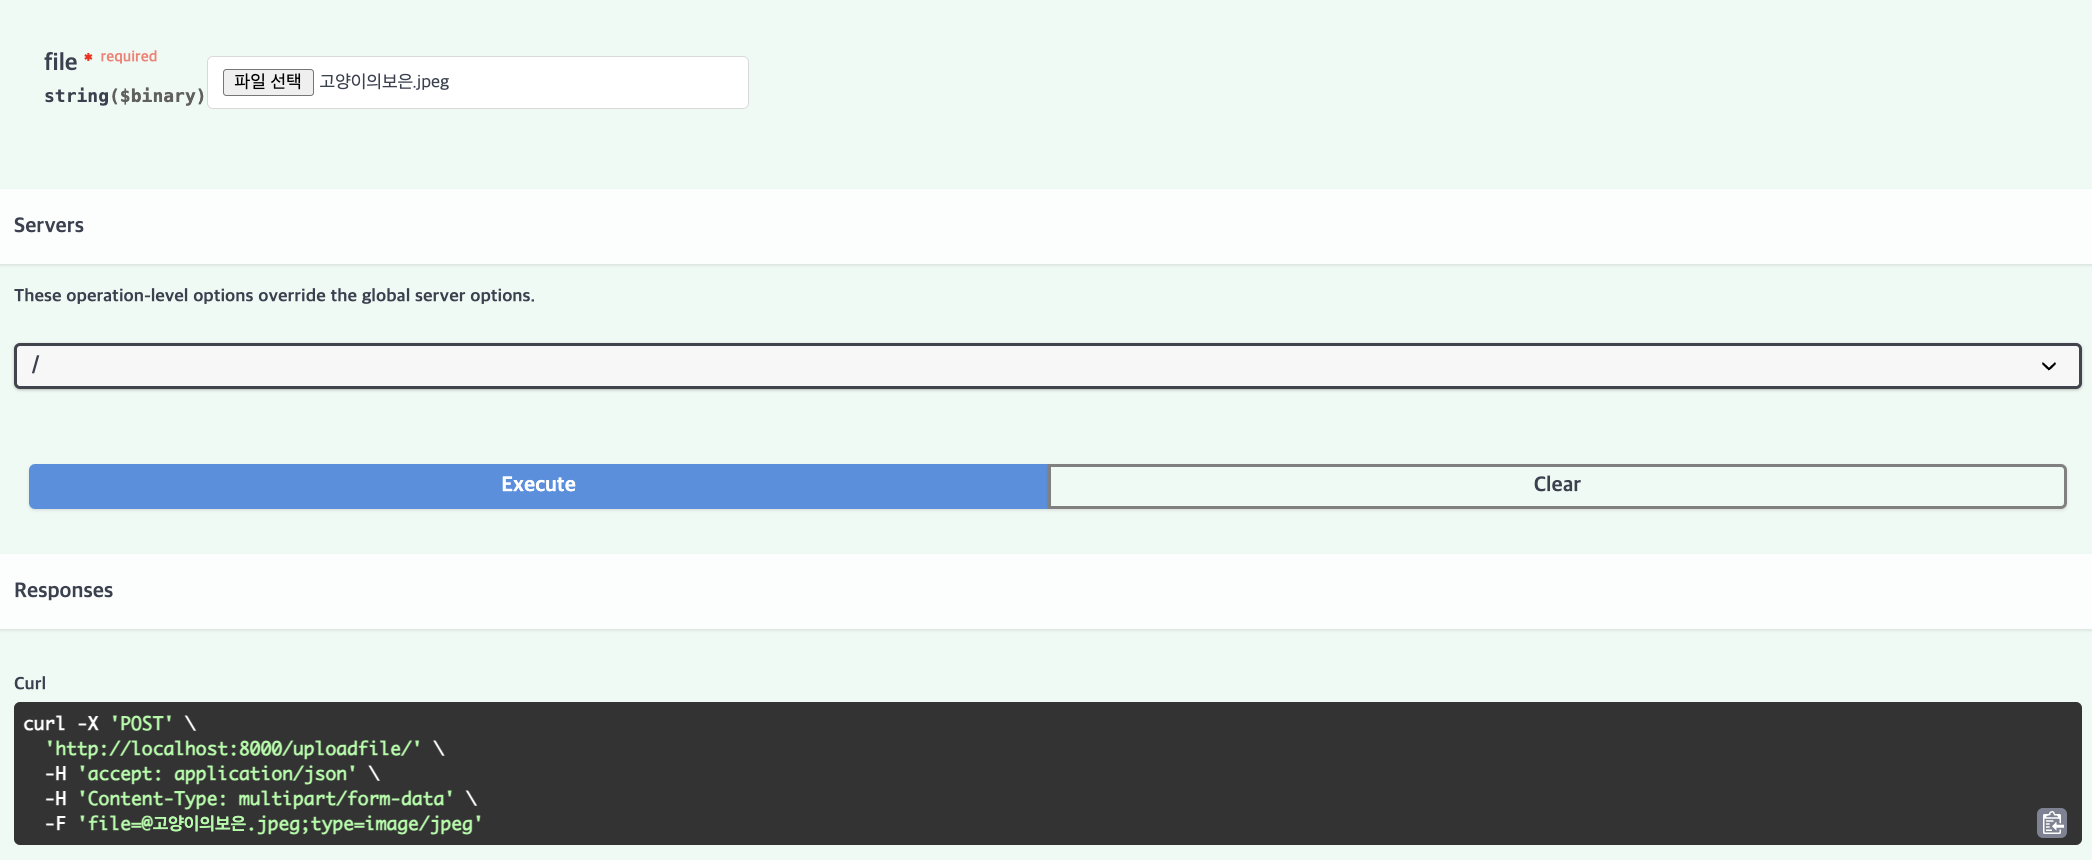
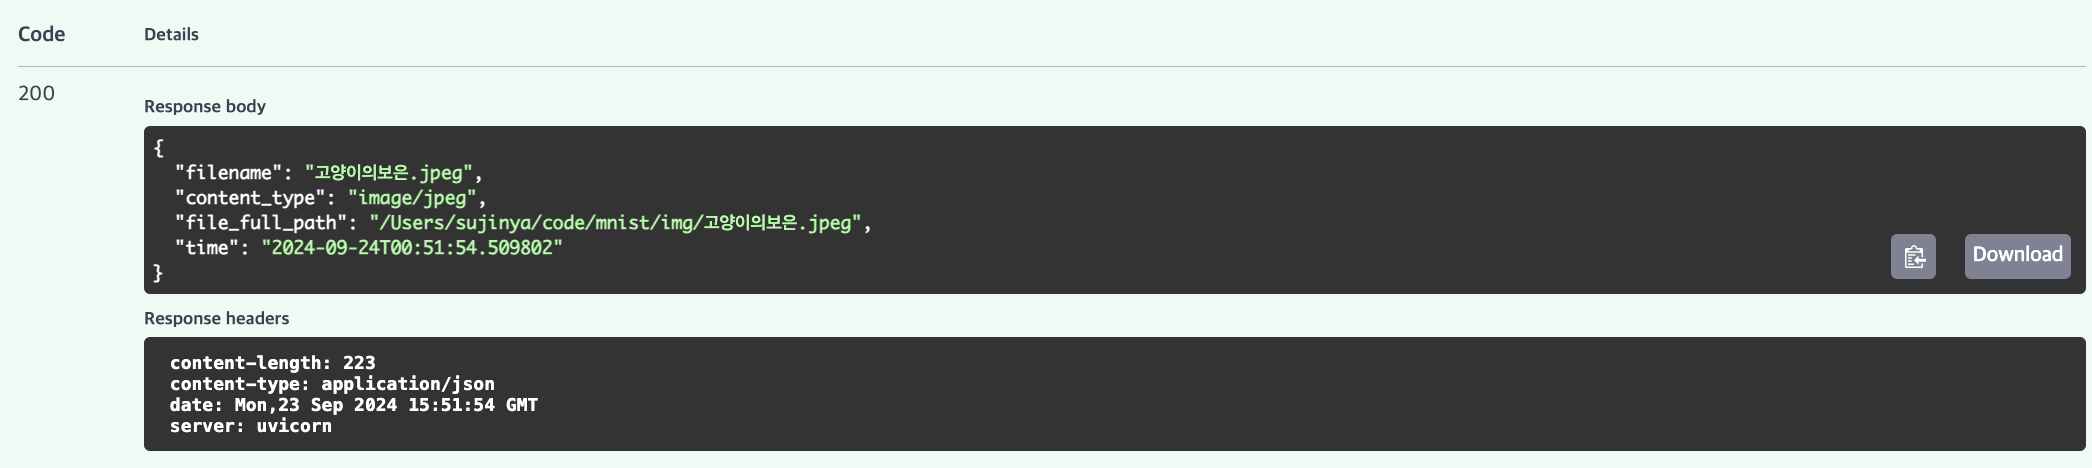

지정한 경로에 파일이 잘 저장되었다.
□ Maria DB 준비
$ sudo docker run -d \
        --name mnist-mariadb \
        -e MARIADB_USER=mnist \
        --env MARIADB_PASSWORD=1234 \
        --env MARIADB_DATABASE=mnistdb \
        --env MARIADB_ROOT_PASSWORD=my-secret-pw \
        -p 53306:3306 \
mariadb:latest- -e MARIADB_USER=mnist: MariaDB에서 사용할 기본 사용자 이름을 mnist로 설정합니다.
- --env MARIADB_PASSWORD=1234: 위에서 설정한 mnist 사용자의 비밀번호를 1234로 설정합니다.
- --env MARIADB_DATABASE=mnistdb: MariaDB 내에서 생성할 초기 데이터베이스의 이름을 mnistdb로 설정합니다.
- --env MARIADB_ROOT_PASSWORD=my-secret-pw: MariaDB의 루트(root) 사용자 비밀번호를 my-secret-pw로 설정합니다.
- -p 53306:3306: 호스트의 53306 포트와 컨테이너의 3306 포트를 연결합니다. 이는 MariaDB가 사용하는 기본 포트인 3306을 컨테이너 안에서 호스트의 53306 포트로 포워딩하여 외부에서 접근할 수 있게 합니다.
- mariadb:latest: 사용할 MariaDB 이미지의 버전을 latest로 지정합니다. 이는 Docker Hub에서 가장 최신 버전의 MariaDB 이미지를 가져오라는 의미입니다.

maria DB 컨테이너를 실행하여 image_processing 테이블을 만든다.
$ docker exec -it mnist-mariadb bash
root@af04cf7da56d:/# mariadb -u mnist -p1234
Welcome to the MariaDB monitor.  Commands end with ; or \g.
Your MariaDB connection id is 46
Server version: 11.5.2-MariaDB-ubu2404 mariadb.org binary distribution

Copyright (c) 2000, 2018, Oracle, MariaDB Corporation Ab and others.

Type 'help;' or '\h' for help. Type '\c' to clear the current input statement.

MariaDB [(none)]> SHOW DATABASES;
+--------------------+
| Database           |
+--------------------+
| information_schema |
| mnistdb            |
+--------------------+
2 rows in set (0.003 sec)

MariaDB [(none)]> use mnistdb;
Reading table information for completion of table and column names
You can turn off this feature to get a quicker startup with -A

Database changed
MariaDB [(none)]> CREATE TABLE image_processing (
    -> num INT AUTO_INCREMENT PRIMARY KEY COMMENT '자동 증가 숫자',
    -> file_name VARCHAR(100) NOT NULL COMMENT '원본 파일명',
    -> file_path VARCHAR(255) NOT NULL COMMENT '저장 전체 경로 및 변환 파일명',
    -> request_time VARCHAR(50) NOT NULL COMMENT '요청시간',
    -> request_user VARCHAR(50) NOT NULL COMMENT '요청 사용자',
    -> prediction_model VARCHAR(100) COMMENT '예측 사용 모델',
    -> prediction_result VARCHAR(50) COMMENT '예측 결과',
    -> prediction_time VARCHAR(50) COMMENT '예측 시간'
    -> )
    -> ;

 MariaDB [mnistdb]> SHOW TABLES;
+-------------------+
| Tables_in_mnistdb |
+-------------------+
| image_processing  |
+-------------------+
1 row in set (0.001 sec)

MariaDB [mnistdb]> desc image_processing;
+-------------------+--------------+------+-----+---------+----------------+
| Field             | Type         | Null | Key | Default | Extra          |
+-------------------+--------------+------+-----+---------+----------------+
| num               | int(11)      | NO   | PRI | NULL    | auto_increment |
| file_name         | varchar(100) | NO   |     | NULL    |                |
| file_path         | varchar(255) | NO   |     | NULL    |                |
| request_time      | varchar(50)  | NO   |     | NULL    |                |
| request_user      | varchar(50)  | NO   |     | NULL    |                |
| prediction_model  | varchar(100) | YES  |     | NULL    |                |
| prediction_result | varchar(50)  | YES  |     | NULL    |                |
| prediction_time   | varchar(50)  | YES  |     | NULL    |                |
+-------------------+--------------+------+-----+---------+----------------+
8 rows in set (0.022 sec)
□ API - DB 연결
main.py를 아래와 같이 수정한다.
from typing import Annotated
import os
from fastapi import FastAPI, File, UploadFile
from datetime import datetime
import pymysql.cursors

app = FastAPI()

@app.post("/uploadfile/")
async def create_upload_file(file: UploadFile):
    img = await file.read()
    file_name = file.filename
    file_ext = file.content_type.split('/')[-1]

    upload_dir = "/Users/sujinya/code/mnist/img"
    if not os.path.exists(upload_dir):
        os.makedirs(upload_dir)

    import uuid
    file_full_path = os.path.join(upload_dir, f'{uuid.uuid4()}.{file_ext}')

    with open(file_full_path, 'wb') as f:
        f.write(img)


    connection = pymysql.connect(host="127.0.0.1",
                                 user='mnist',
                                 password='<비밀번호 입력>',
                                 database='mnistdb',
                                 port=int(53306),
                                 cursorclass=pymysql.cursors.DictCursor)
    sql = "INSERT INTO image_processing(`file_name`, `file_path`, `request_time`, `request_user`) VALUES(%s,%s,%s,%s)"

    import jigeum.seoul #시간모듈
    with connection:
        with connection.cursor() as cursor:
            cursor.execute(sql, (file.filename, file_full_path, jigeum.seoul.now(), 'n01'))

        connection.commit()

    return {
            "filename": file.filename,
            "content_type": file.content_type,
            "file_full_path": file_full_path,
            "time": jigeum.seoul.now()
}- uuid.uuid4()를 사용하여 파일명에 고유 식별자를 추가함으로써 파일명 충돌을 방지합니다.
- pymysql 라이브러리를 사용하여 MariaDB 데이터베이스에 연결합니다.
$ pdm add pymysql
$ pdm install- with connection 블록 안에서 데이터베이스 작업을 수행하고, 블록을 벗어날 때 자동으로 연결을 종료한다.
- cursor : 데이터베이스와 상호작용하기 위해 커서를 생성한다. 이 커서는 SQL 쿼리를 실행하는 데 사용된다.
- cursor.execute(): sql 쿼리를 실행하고, 두 번째 인자로 전달된 튜플의 값들을 쿼리에 삽입한다.
□ 중복 데이터 처리
같은 이름의 파일을 여러 번 업로드하면 한 개의 파일만 DB에 업로드된다.
같은 파일이라도 file_path를 고유값으로 주어 이 문제를 해결한다.
위의 코드 설명에서 uuid에 해당되는 내용이다.
import uuid
file_full_path = os.path.join(upload_dir, f'{uuid.uuid4()}.{file_ext}')
동일한 파일을 여러 번 업로드 한 결과이다.
파일이름이 고유한 형식으로 저장되는 것을 확인할 수 있다.

** 가독성을 위한 아키텍처 설계 -> 시간 나면 해보기 ㅠㅠ
db.py 만들어서 하는것임
import pymysql.cursors
import os

def get_conn():
  db_host = os.getenv("DB_IP", "localhost")
  db_port = os.getenv("DB_PORT", "53306")
  conn = pymysql.connect(   host=db_host,
                            port=int(db_port),
                            user='mnist', password = '1234',
                            database='mnistdb',
                            cursorclass=pymysql.cursors.DictCursor)
  return conn


def select(query: str, size = -1):
  conn = get_conn()
  with conn:
      with conn.cursor() as cursor:
          cursor.execute(query)
          result = cursor.fetchmany(size)

  return result


def dml(sql, *values):
  conn = get_conn()

  with conn:
    with conn.cursor() as cursor:
        cursor.execute(sql, values)
        conn.commit()
        return cursor.rowcount
□ worker.py
우리는 숫자 이미지를 업로드하여 MNIST 딥러닝 모델을 사용하여 손글씨 숫자를 인식하려고 한다.
하지만 아직 모델을 만들지 않았기 때문에 아래 코드에서 prediction_model / prediction_result / prediction_time 세 개의 컬럼이 NULL 값인 상태이다. 따라서 랜덤한 숫자를 넣을 것 이다. 추가적으로 라인 알람을 설정해주었다.
import jigeum.seoul
import requests
import os

def run():
    """image_processing 테이블을 읽어서 가장 오래된 요청 하나씩을 처리"""

    # STEP 1
    # image_processing 테이블의 prediction_result IS NULL 인 ROW 1 개 조회 - num 갖여오기

    from mnist.db import get_conn
    from random import randrange
    conn = get_conn()

    with conn:
        with conn.cursor() as cursor:
            sql = "SELECT * FROM image_processing WHERE prediction_result IS NULL ORDER BY num"
            cursor.execute(sql)
            result = cursor.fetchall() #모든 행을 가져옴

    # STEP 2
    # RANDOM 으로 0 ~ 9 중 하나 값을 prediction_result 컬럼에 업데이트
    # 동시에 prediction_model, prediction_time 도 업데이트

            for i in result:
                number = randrange(10)
                num_id = i["num"] #key값
                sql = f"""
                        UPDATE image_processing
                        SET prediction_result = {number},
                            prediction_model = {number},
                            prediction_time = '{jigeum.seoul.now()}'
                        WHERE num = {num_id}
                        """
                cursor.execute(sql)

            conn.commit()


    # STEP 3
    # LINE 으로 처리 결과 전송
    KEY = os.environ.get('API_TOKEN')
    url = "https://notify-api.line.me/api/notify"
    data = {"message": "성공적으로 저장했습니다!"}
    headers = {"Authorization": f"Bearer {KEY}"}
    response = requests.post(url, data=data, headers=headers)

    print(response.text)

    return True
$ cat pyproject.toml
[project.scripts]
ml-worker = 'mnist.worker:run'
$ cat ~/.zshrc
export LINE_API_TOKEN= <비밀>
fastapi에서 이미지를 업로드하면 아래와 같이 DB에 저장되고,
의도했던대로 prediction_model / prediction_result 가 null이 아닌 랜던 값인 것을 확인할 수 있다.

그리고 아래와 같은 방식으로 run 함수를 실행시키면 라인 메시지가 오는 것을 확인할 수 있다.
$ ml-worker
{"status":200,"message":"ok"}
**크론탭 시간나면 해보기
학원에서 했던 내용에 이어서 하지 않고 집에서 쓰는 노트북에 새로 디렉토리를 만들어서 작업했다.
이 내용을 기존에 존재하던 mnist 레포에 연결하고 싶었다.
방법)
1. 원격 레포지토리 설정
$ git remote add origin <깃헙주소(나는 ssh로 했음)>
2. 브랜치 체크아웃
$ git checkout -b 0.1
3. 파일 추가 및 커밋
$ git add .
$ git commit -m "home"
$ git push --set-upstream origin 0.1
checkout -b 옵션을 새로 알게 되었다. \^0^/
'playdata > daily' 카테고리의 다른 글
| 12주차 : Day 3 (9/25) (1) | 2024.09.30 |
|---|---|
| 12주차 : Day 2 (9/24) (0) | 2024.09.30 |
| 10주차 : Day 4,5 (9/12,13) (3) | 2024.09.23 |
| 10주차 : Day 2,3 (9/10,11) (0) | 2024.09.23 |
| 10주차 - Day 1(9/9) (0) | 2024.09.23 |